Dryer Drive Belt Replacement
Dryer drive belt replacement guide: spot the signs of a broken belt, open your dryer safely, and route the new belt around the idler pulley.
Need appliance repair? Call now for same-day service.
Call +1 (888) 206-0056The motor hums. The drum sits still. Your clothes tumble nowhere. That is the classic sign of a broken belt. Dryer drive belt replacement is one of the most common dryer repairs. The part is cheap. The job takes under an hour. This guide shows every step, including the idler pulley routing that trips up first-timers.
Signs You Need Dryer Drive Belt Replacement
Press start and listen. A humming motor with a still drum means the belt broke or slipped off. The motor runs. Nothing connects it to the drum.
Open the door and spin the drum by hand. A healthy belt gives resistance. The drum turns stiffly because the belt grips it. A broken belt lets the drum spin freely with no drag. This test takes five seconds.
A burning rubber smell is another clue. A slipping belt rubs and heats up. You may smell it before the belt snaps. Do not keep running the dryer at this point. A slipping belt can damage the idler pulley.
A thumping noise that speeds up can mean a cracked belt. The crack slaps with each drum turn. The belt may still work for a while. It will fail soon. Plan the replacement now.
If your dryer has other symptoms too, read our how to fix a dryer guide first. It helps you confirm the belt is the real problem before you open the machine.
Safety First: Unplug the Dryer
Unplug electric dryers from the outlet. Electric dryers use 240 volts. That voltage can kill. Do not trust the power button. Pull the plug.
For gas dryers, unplug the power cord and turn off the gas valve behind the dryer. You will not touch gas parts during a belt swap. But shutting the valve is cheap insurance.
Keep track of your screws. Dryer panels use several screw types. A muffin tin or magnetic tray keeps them sorted. Take phone photos as you remove panels. The photos guide reassembly.
Open the Dryer Cabinet
Most dryers open from the top. Slide a putty knife under the front edge of the top panel, about two inches from each corner. Push in to release the spring clips. Lift the top panel and lean it back against the wall.
Remove the front panel next. Unscrew the screws inside the top edge and along the sides. Disconnect the door switch wires. Note where they plug in. Lift the front panel off and set it aside.
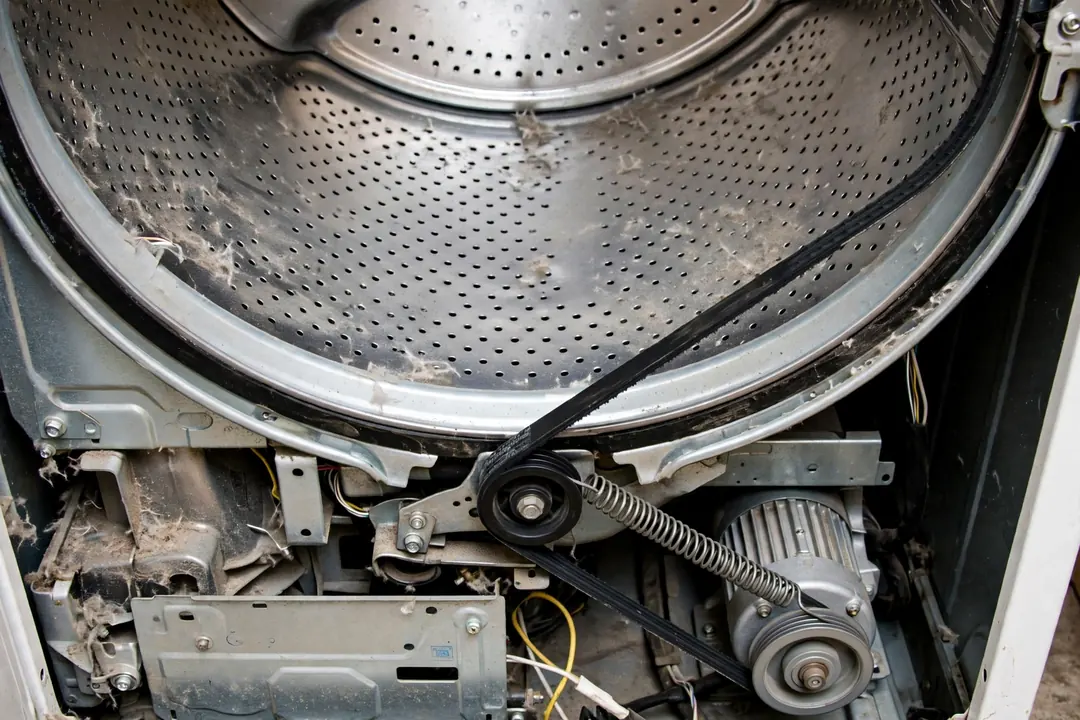
You now see the drum, the belt area, and the motor at the bottom. If the old belt hangs loose or lies in the cabinet bottom, it snapped. If it still loops the drum but loosely, it stretched or slipped.
Remove the Old Belt
Note how the old belt sits before you touch it. If it broke, look at the wear pattern. A shiny glazed side means it slipped for a while. Cracks across the ribs mean age killed it.
Slide the old belt off the drum. On most models, you lift the drum slightly and slip the belt past. Set the drum down gently on a towel. The drum is light but awkward.
Inspect the idler pulley while you are in there. It sits near the motor on a spring arm. Spin it by hand. It should turn smoothly and quietly. A seized or wobbly pulley strains belts. Replace it now if it feels rough.
Check the drum support rollers. Spin each one. They should turn freely with no wobble. Flat spots or grinding mean replacement time. Our dryer squeaking noise guide explains what each roller sound means.
Route the New Belt Around the Idler Pulley
This is the step everyone worries about. It is simpler than it looks. The belt loops around the drum with the ribbed side facing inward. The smooth side faces out.
Loop the belt around the drum first. Position it in the wear groove where the old belt sat. The belt should sit centered on the drum.
Now reach under the drum to the motor and idler pulley. Push the idler pulley arm to create slack. Loop the belt around the motor pulley first. Then loop it around the idler pulley.
The correct path forms a zigzag. The belt runs from the drum down to the motor pulley. Then it loops back up around the idler pulley and returns to the drum. The idler pulley presses against the smooth outside of the belt. Its spring keeps the belt tight.
Double-check the routing. The belt must not twist. A twisted belt flips off within minutes. The ribs must face the drum and the motor pulley grooves.
Turn the drum by hand several full turns. The belt should track straight and stay centered. The motor pulley and idler should turn with it. If the belt walks sideways, reseat it.
Replace Worn Rollers at the Same Time
You already have the dryer open. Check every roller now. A full roller kit costs little more than one roller. Replacing them all prevents a repeat teardown.
Pop each roller off its shaft. Clean the shaft with a dry cloth. Slide the new roller on. It should spin freely. A drop of the manufacturer-recommended lubricant on the shaft helps on some models. Never use regular oil. It gums up with lint.
Replace the idler pulley if it showed any roughness. The pulley and belt work as a team. A rough pulley eats a new belt fast.
Reassemble and Test
Lift the drum back into place. Set the front panel on. Reconnect the door switch wires exactly as they were. Your photos help here. Screw the front panel snug.
Lower the top panel until the clips snap. Give it a firm press at each corner. Plug the dryer back in. For gas models, turn the gas valve back on.
Run the dryer empty for ten minutes. Listen for rubbing or thumping. Watch through the door. The drum should turn smoothly. Open the door mid-cycle to confirm the drum stops with the door switch. It should.
If the drum turns and heats normally, the job is done. If you also had heating trouble, our dryer heating element replacement guide covers the next most common repair.
Prevent the Next Belt Failure
Do not overload the dryer. Heavy loads strain the belt and the motor. Fill the drum no more than three-quarters full. Wet towels are the worst offenders.
Clean the lint filter every load. A clogged filter overheats the dryer. Heat ages rubber belts faster. This two-second habit extends belt life.
Keep rollers in good shape. A seized roller forces the belt to drag the drum. That friction snaps belts. Listen for squeaks and fix them early.
When to Call a Professional
Call a technician if the motor itself hums but never turns even with the belt off. A seized motor needs replacement. That job involves wiring and is best left to a pro.
Also call if the drum has play side to side after the new belt is on. Worn drum glides or a bent drum need professional parts and fitting. Our dryer repair hub covers every common dryer fault.
Call us at +1 (888) 206-0056 for dryer help in any of our service locations. We replace belts, rollers, and pulleys in a single visit.
Frequently Asked Questions
How do I know if my dryer belt is broken?
The drum will not turn but you hear the motor hum when you press start. Open the door and try to spin the drum by hand. If it spins with no resistance, the belt is broken or slipped off. A burning rubber smell during the cycle is another warning sign.
Can I replace a dryer belt myself?
Yes, it is a common DIY repair. You need the correct belt for your model, a screwdriver, and a putty knife to release the top panel clips. The job takes 30 to 60 minutes. The tricky part is routing the belt around the idler pulley, which this guide explains step by step.
How much does dryer belt replacement cost?
The belt itself typically costs $10 to $30. A professional replacement usually runs $120 to $200 including the service call. Doing it yourself saves the labor cost. If the technician finds worn rollers too, expect the parts total to rise modestly.
Should I replace the rollers when I replace the belt?
Yes, if they show wear. Rollers and belts age together. Spin each roller by hand while the dryer is open. If any wobble, feel rough, or look flat-spotted, replace them. A roller kit costs little and prevents a second teardown in six months.
Why did my dryer belt break?
Age is the main cause. Rubber belts dry out and crack after years of heat cycles. Overloading the dryer strains the belt. A seized roller or idler pulley also overloads it. Fix the underlying cause or the new belt will fail early too.
How long does a dryer belt last?
Most dryer belts last 8 to 12 years under normal use. Heavy use and frequent overloading shorten that. If your dryer is in that age range and the drum stops turning, the belt is the first part to check.
Broken appliance? We're one call away.
Same-day appliance repair across 40 cities. Upfront pricing, written warranty, and an honest repair-or-replace answer on every job.
Call +1 (888) 206-0056